Model Order Reduction NoteBook
Introduction
In this python notebook exemple we will see with 2 real examples how to reduce a model from one of your sofa scene thanks to the Model Order Reduction plugin done by the INRIA research team Defrost.
the two examples will be :
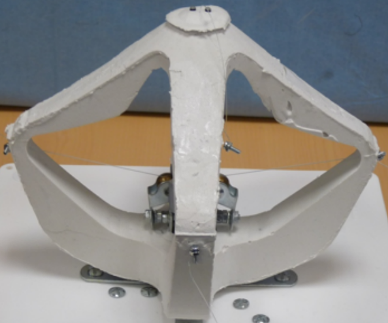
A cable-driven silicone robot (paper link : C. Duriez, ICRA, 2013).
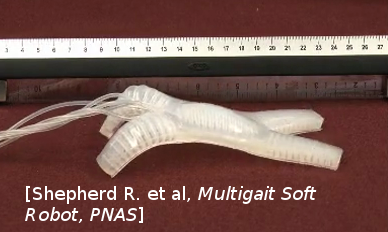
A pneumatic Soft Robot (paper link : Multigait soft Robot R.F. Shepherd et al, PNAS, 2011).
After these expample presentation we can now proceed to the reduction. First we have to prepare it by setting a bunch of parameters while explaining there purpose (here the parameters will be set twice, one for the diamond and one for the starfish so you will be able to switch easily between each example)
User Paramters
Before defining the reduction parameters, here are some “import” commands that will be useful for this python notebook:
# Import
import os
import sys

sys.path.append(os.getcwd()+'/../python')

# MOR IMPORT
from mor.gui import utility
from mor.reduction import ReduceModel
from mor.reduction.container import ObjToAnimate
1. Paths to the SOFA scene, mesh and outputs:
The scene you want to work on
The folder where you want the results to be put in
# Select Output Dir and original scene name & path
from PyQt5 import QtWidgets
app = QtWidgets.QApplication(sys.argv)

originalScene = utility.openFileName('Select the SOFA scene you want to reduce')
outputDir = utility.openDirName('Select the directory that will contain all the results')

# If you haven't installed PyQt the previous function won't work
# As an alternative you can enter the absolute path to the corresponding files directly:
# originalScene = /PathToMy/Original/Scene
2. The different reduction parameters
nodeToReduce
contains the SOFA path from the rootnode to the model you want to reduce.
nodesToReduce_DIAMOND = ['/modelNode']
nodesToReduce_STARFISH =['/model']
listObjToAnimate
Contains a list of objects from the class ObjToAnimate.
An ObjToAnimate will define an object to “animate” during the shaking.
There are 3 main parameters to this object :
location: Path to obj/node we want to animate.
animFct: the animation function we will use (here we use defaultShaking).
all the arguments that will be passed to the animFct we have chosen.
For example, here we want to animate the node named “north”, but we won’t specify the animFct so the default animation function will be used and applied to the first default object it will find. The default function will need 3 additional parameters :
incrPeriod (float): Period between each increment
incr (float): Value of each increment
rangeOfAction (float): Until which value the data will increase
north = ObjToAnimate(“north”, incr=5,incrPeriod=10,rangeOfAction=40)
# animation parameters

### CABLE-DRIVEN PARALLEL ROBOT PARAMETERS
north = ObjToAnimate("modelNode/north", incr=5,incrPeriod=10,rangeOfAction=40)
south = ObjToAnimate("modelNode/south", incr=5,incrPeriod=10,rangeOfAction=40)
east = ObjToAnimate("modelNode/east", incr=5,incrPeriod=10,rangeOfAction=40)
west = ObjToAnimate("modelNode/west", incr=5,incrPeriod=10,rangeOfAction=40)
listObjToAnimate_DIAMOND = [north,south,east,west]

### MULTIGAIT SOFT ROBOT PARAMETERS
centerCavity = ObjToAnimate("model/centerCavity", incr=350,incrPeriod=2,rangeOfAction=3500)
rearLeftCavity = ObjToAnimate("model/rearLeftCavity", incr=200,incrPeriod=2,rangeOfAction=2000)
rearRightCavity = ObjToAnimate("model/rearRightCavity", incr=200,incrPeriod=2,rangeOfAction=2000)
frontLeftCavity = ObjToAnimate("model/frontLeftCavity", incr=200,incrPeriod=2,rangeOfAction=2000)
frontRightCavity = ObjToAnimate("model/frontRightCavity", incr=200,incrPeriod=2,rangeOfAction=2000)
listObjToAnimate_STARFISH = [centerCavity,rearLeftCavity,rearRightCavity,frontLeftCavity,frontRightCavity]
Modes parameters
addRigidBodyModes (Defines if our reduce model will be able to translate along the x, y , z directions)
tolModes ( Defines the level of accuracy we want to select the reduced basis modes)
addRigidBodyModes_DIAMOND = [0,0,0]
addRigidBodyModes_STARFISH = [1,1,1]

tolModes = 0.001
tolGIE
tolerance used in the greedy algorithm selecting the reduced integration domain(RID). Values are between 0 and 0.1 . High values will lead to RIDs with very few elements, while values approaching 0 will lead to large RIDs. Typically set to 0.05.
# Tolerance
tolGIE =  0.05
3 – Optional parameters
# Optionnal
verbose = False
nbrCPU = 4
packageName = 'test'
addToLib = False
verbose
can bring more useful log while doing a reduction.
nbrCPU
depending on the number of ObjToAnimate you have previously declared, the reduction process will need to launch many sofa scenes with different animation patterns. To do that faster we can parallelise this process by indicating a number of CPU and doing so the number of scenes that will be run simultaneously.
addToLib & packageName
These 2 variables are to be used if you want at the end of the reduction to create a reusable python module of the result that will be placed in
/python/morlibto import and use it easily in your scene.
We can now execute one of the reductions we choose with all these parameters
Execution
Initialization
The execution is done with an object from the class ReduceModel.
we initialize it with all the previous argument either for the Diamond or Starfish example
# Initialization of our script
nodesToReduce = nodesToReduce_DIAMOND # nodesToReduce_STARFISH
listObjToAnimate = listObjToAnimate_DIAMOND # listObjToAnimate_STARFISH
addRigidBodyModes = addRigidBodyModes_DIAMOND # addRigidBodyModes_STARFISH

reduceMyModel = ReduceModel(    originalScene,
                                nodesToReduce,
                                listObjToAnimate,
                                tolModes,tolGIE,
                                outputDir,
                                packageName = packageName,
                                addToLib = addToLib,
                                verbose = verbose,
                                addRigidBodyModes = addRigidBodyModes)
We can finally perform the actual reduction.
phase1
We modify the original scene to do the first step of MOR :
We add animation to each actuators we want for our model
And add a writeState componant to save the shaking resulting states
reduceMyModel.phase1()
phase2
With the previous result we combine all the generated state files into one to be able to extract from it the different mode
reduceMyModel.phase2()
print("Maximum number of Modes : ")
reduceMyModel.reductionParam.nbrOfModes
phase3
We launch again a set of sofa scene with the sofa launcher with the same previous arguments but with a different scene
This scene take the previous one and add the model order reduction component:
HyperReducedFEMForceField
MechanicalMatrixMapperMOR
ModelOrderReductionMapping and produce an Hyper Reduced description of the model
reduceMyModel.phase3()
phase4
Final step : we gather again all the results of the previous scenes into one and then compute the RID and Weigts with it. Additionnally we also compute the Active Nodes
reducedScene = reduceMyModel.phase4()
End of example you can now go test the results in the folder you have designed at the beginning of this tutorial
To go Further
Links to additional information about the plugin: